Most inflatable kayaks fail on land, not on the water. The pump session runs long, the floor stays soft, the seat slides, and by the time you push off you are already tired and the boat is already wallowing. A clean Intex inflatable kayak setup takes about as long as rigging a fishing rod, and almost all of the difference comes down to the order you inflate things in and how honest you are about pressure.
I have paddled Florida springs and mangrove creeks most weekends for nine years, and I keep two inflatables in the truck: one drop-stitch boat I baby, and one cheap recreational tube I have patched twice, once with a bicycle tire repair kit after a submerged branch opened a two-inch gash in the hull. That patch is still holding three summers later, which taught me more about hull material and glue than any spec sheet ever did.
This is the setup routine, in order, for the two boats in this article. No magic, no marketing. Just the sequence that gets you off the ramp with a firm floor, a seated skeg, and a boat that holds its line instead of hunting for one.
How I think about inflatable kayaks
Setup time is the spec that matters. A fifteen-minute pump session kills a trip, and a boat that takes fifteen minutes on the ramp is a boat you stop using by August. Everything below is built around cutting that number without cutting pressure.
Second, every inflatable leaks eventually. The question is never whether, it is how easy it is to patch. SuperStrong PVC, the material both of these boats are built from, patches cleanly with a vinyl patch and proper glue because the surface is smooth and non-porous. That is a real advantage over coated fabrics that fuzz up the moment you abrade them.
Third, drop-stitch is not a magic word, and PSI on a hull that does not have a drop-stitch floor will not buy you hardshell stiffness. On a recreational inflatable you are not chasing a board. You are chasing a boat that holds its shape, tracks straight, and does not need a repair kit on the first trip.
Fourth, weight ratings are lab numbers. A 400 lb rating on a calm pond with a light paddler is not the same as 400 lb on a hot afternoon with gear, wind, and chop. Plan on the boat behaving like a smaller boat than the sticker suggests, and load accordingly.
The two boats, and who each one is for
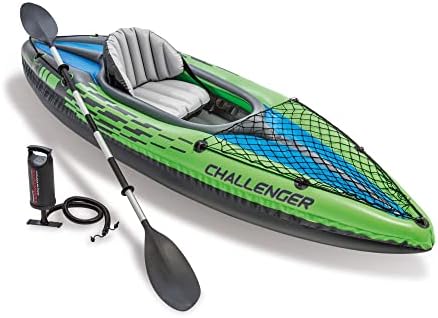
Budget solo pick: INTEX Challenger Inflatable Kayak Series: Includes Deluxe 86in Kayak Paddles and High-Output Pump, SuperStrong PVC, Adjustable Seat with Backrest, Removable Skeg, Cargo Storage Net
 Visit on Amazon →
The Challenger is the boat I point at when someone wants to paddle a calm lake, a slow river, or a protected bay without spending real money. It arrives as a set: the hull, a pair of 86-inch paddles, a high-output hand pump, an adjustable seat with a backrest, a removable skeg, and a cargo net. That matters more than it sounds, because a kayak you cannot paddle on day one is a kayak you use twice.
The removable skeg does the most work of anything in that list. A recreational inflatable with a flat, slightly rockered bottom will weathervane in any crosswind, and no amount of paddling technique fully fixes it. The skeg does. Install it before you launch, every time you are on flat water.
Caveats worth knowing before you buy: this is a calm-water boat. Wind and current move it more than the marketing implies, so keep it off open water and out of the stronger spring runs until you know how it handles. The included paddles are recreational aluminum-shaft paddles, fine for flat water and heavy over a long day. And the seat is adjustable but basic, so add a thin pad if you plan on three-hour sessions.
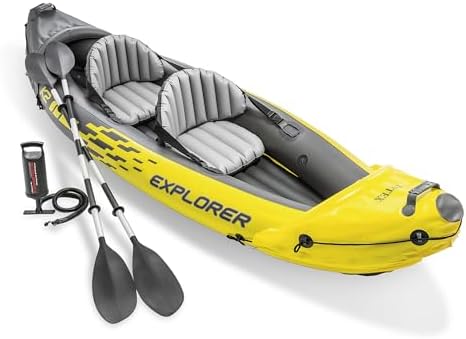
Tandem pick: Intex 68307EP Explorer K2 Inflatable Kayak Set: Includes Deluxe 86in Aluminum Oars and High-Output Pump, SuperStrong PVC, Adjustable Seats with Backrest, 400lb Weight Capacity
 Visit on Amazon →
The Explorer K2 is the same idea sized for two. Two adjustable seats with backrests, 86-inch aluminum oars, a high-output pump, and a 400 lb weight capacity rating. The aluminum oars are a genuine step up from plastic-bladed paddles, and on a two-person boat that matters, because you are moving twice the hull.
Two paddlers in one inflatable is where tracking problems show up first. Two people never paddle in perfect sync, so the boat yaws constantly unless the hull is firm, the skeg is in, and the weight is trimmed. Seat placement and load position matter more here than on a solo boat.
Caveats worth knowing before you buy: 400 lb is the lab number. With two adults plus gear the boat sits lower, paddles slower, and feels the load in chop. If you regularly carry two adults and a cooler, you are at the ceiling, not in the comfortable middle. It is also a wide boat, so a solo paddler using it alone will fight the wind more than they would in the Challenger.
How to set up an Intex inflatable kayak: the step by step
Step 1: Stage in the shade and unpack everything
Lay the hull flat, out of direct sun if you can find it, and pull out the pump, the paddles, the seat, the skeg, and the cargo net. Do this before you start pumping. Half of every slow ramp launch is somebody walking back to the truck for the seat.
Step 2: Inflate the floor chamber first
The floor goes first, always. The floor chamber gives the hull its shape, and the side chambers need something firm to push against. Inflate the sides first and you get a boat that looks fine on the grass and folds under your knees on the water.
Take the floor to firm, not rock hard. You will top it off at the end.
Step 3: Inflate the side chambers, then top off the floor
Fill the sides evenly, alternating a few strokes per side if your pump setup makes that easy. Once the sides are firm, go back and add air to the floor. This is the order that produces a hull with a flat bottom instead of a banana.
Step 4: Set pressure by feel, then confirm it
Squeeze the side chamber with your thumb. It should feel like a well-inflated basketball, not a pillow and not a rock. If the pump has a gauge, use it. If it does not, your hands are the gauge, and you should still buy a cheap inline gauge.
Two pressure rules that save hulls:
- On a hot day, stop short of maximum. Air expands in the sun, and a boat pumped to the limit on the dock will be over the limit ten minutes later.
- Cold water contracts the air. A boat that felt perfect on the ramp will feel soft twenty minutes into a spring run. That is normal. Top it up at the takeout, not mid-river.
Step 5: Fit the seat and the backrest
Set the seat where your knees bend slightly and your feet can brace. On the Challenger, that usually means the seat sits roughly centered with the backrest strapped low. On the Explorer K2, set the front seat so the bow paddler is not crowding the cargo area, and the rear seat so the stern paddler is not sitting on the tubes.
Tighten the backrest until it supports your lower back, then stop. Crank it hard and you pull the side chamber out of shape, which is a tracking problem you created with your own hands.
Step 6: Install the skeg
Push the skeg into its mount at the stern and make sure it seats fully. It should take seconds. If it fights you, check for sand or a twisted mount, because a skeg that is halfway in is a skeg that falls out at the worst moment.
On flat water, the skeg stays in. On a shallow rocky run, pull it. That is the whole decision.
Step 7: Load the cargo net with weight forward
Weight goes forward and low. A heavy cooler or dry bag sitting behind you lifts the bow, and a lifted bow catches wind like a sail. Move the load toward the middle and slightly ahead of your seat, then check that the boat floats level at the launch.
Step 8: Launch from knee-deep water and trim the boat
Wade in to about knee depth, hold the boat steady, and step into the center. Sit down before you push off. Once you are floating, look at the bow. If it is plowing, shift weight aft. If it is riding high, shift weight forward. Thirty seconds of trimming saves an hour of corrective strokes.
Step 9: Deflate, dry, and store it loose
At the takeout, wipe the hull down, then deflate. Fold it loosely, not tight, and never store it wet. Mildew in a storage bag is the most common way a perfectly good inflatable gets ruined, and it has nothing to do with the water you paddled.
How to make an inflatable kayak track straight
Tracking is the difference between paddling and correcting. Four fixes, in order of how much they help:
- Skeg in. If it is removable and you are on flat water, it should be installed. This is the single biggest change.
- Fix the trim. Bow down slightly is better than bow up. Move weight forward until the bow just kisses the water.
- Firm up the hull. A soft side chamber flexes and the hull twists under each stroke. Top off pressure.
- Shorten your stroke. Long, slow strokes in an inflatable let the bow wander between them. Shorter, quicker strokes with a firm catch hold the line better.
If the wind is blowing across your bow and the boat still wants to turn, accept the zigzag and paddle one side for a few strokes to correct, rather than fighting it every stroke. Fighting costs more energy than correcting.
Heat, pressure, and the two mistakes that ruin hulls
Over-inflation in the sun is the first one. A boat pumped to the limit on a hot dock can split a seam by afternoon. Leave headroom.
Dragging the hull is the second. Concrete, asphalt, and shell hash abrade PVC, and abrasion is where leaks start. Carry the boat to the water, even when it is only twenty feet.
Patching, and why it is not a disaster
A puncture in a PVC inflatable is a repair, not a funeral. Clean the area with alcohol, cut a round patch (round corners do not peel), apply vinyl glue to both surfaces, let it get tacky, press, weight it, and leave it alone for a full day.
That is the standard I hold these boats to. My cheap hull has held a tire-kit patch for three summers, and a proper vinyl patch on a smooth PVC surface is a better repair than that. What you want to avoid is a hull material that tears and keeps tearing, and smooth PVC does not do that.
Common mistakes I see on the ramp
- Pumping the sides before the floor, then wondering why the boat folds.
- Skipping the skeg, then blaming the boat for bad tracking.
- Over-tightening the backrest until the side chamber deforms.
- Loading all the weight behind the seat.
- Storing the boat folded wet in a hot garage.
- Judging pressure by how the boat looks on the grass instead of how it feels in the water.
What the setup actually costs
Both of these come as sets, so the pump and the paddles are already in the box. Check current Amazon price on each listing and compare that against what you would spend assembling the same kit piece by piece, because that is the real value question.
Budget separately for the things that do not come in the box: a patch kit with fresh glue, an inline pressure gauge, a dry bag, and a properly fitted PFD. The PFD is not optional. No inflatable kayak setup is finished without one.
The bottom line
Floor first, sides second, top off the floor, skeg in, weight forward, backrest snug but not cranked. That is the whole routine, and it takes less time than reading this article.
The boats in this guide are calm-water recreational inflatables, and they are honest about that if you read them right. Set them up in the right order, keep the pressure sane, install the skeg, and trim the load, and you get a boat that tracks straight on a lake or a slow spring run without costing what a drop-stitch hull costs. Skip those steps and you get the boat everybody complains about online. The difference is on you, not on the sticker.