Most inflatable kayak setup guides start with the boat. That is backwards. The boat is a folded sheet of PVC in a box, and what you actually live with is the sequence you repeat every single time you want to be on the water. Get the sequence right and you launch in the time it takes a hardshell paddler to strap down a roof rack. Get it wrong and you are the person at the ramp at 7 a.m. pumping while everyone else is already working the flat.
I have paddled Florida springs and mangrove creeks most weekends for the last nine years, and I worked as a charter fishing deckhand in my twenties, which is where I learned that water does not care what the box said. I own two inflatables: a drop-stitch boat I baby, and a cheap recreational tube I have patched twice. The second patch went on with a bicycle tire repair kit after a submerged branch opened a two-inch gash in the hull, and it is still holding three summers later. That repair taught me more about hull material and glue than any spec sheet ever has.
This is the how-to, not the shopping list. Below is the setup sequence I run, the inflation habits that keep a hull alive, how to make a soft-floor boat track straight in a light chop, how to patch PVC so the repair holds, and where the two boats in this guide fit for a calm-water paddler.
Why you should trust me
My rules for anything inflatable are boring and consistent. I do not repeat a weight rating without noting how the boat behaves with a real paddler aboard and gear in the bow. I do not call a hull tough until I know how it patches, because every inflatable leaks eventually and the only question that matters is whether the tear spreads or stops. I do not trust a setup time that was not run with a hand pump, on a ramp, with the sun already up. And I do not quote a price without the pump, the paddle, and the bag counted in the number, which is one reason the two boats below are worth a look: both of them ship as complete kits.
If you want the shopping version of this decision, that is a different article. Today is about doing the work correctly once you own the boat.
What an inflatable kayak setup actually requires
Less than you think, which is the whole point of an inflatable. Here is the short list:
- The boat, with its floor, seats, and skeg or fin.
- A high-output hand pump with the right valve adapter. Both boats below include one.
- Paddles. Both boats below include an 86-inch paddle set.
- A properly fitted PFD. Non-negotiable, and it is not in the box.
- A patch kit with fresh glue and vinyl patch material. Check the glue before you need it, because dried-out glue in a sealed box is one of the great small tragedies of paddling.
- A dry bag for phone, keys, and a layer.
- A towel and a small sponge, so you can dry the hull before it goes back in the bag.
That is it. If you are buying a recreational inflatable, do not let anyone sell you a second pump or a second paddle before you have inflated the boat once with what came in the box.
The two boats in this guide
Both of these are recreational inflatables, which is a specific category. They are built for flat water, protected bays, slow rivers, and lakes. They are not surf boats, they are not whitewater boats, and they are not the boat you take across an open bay when the wind is building. Within that lane, they are two of the most common first kayaks on the water, and for good reason: they arrive as kits, and they are forgiving of a beginner.
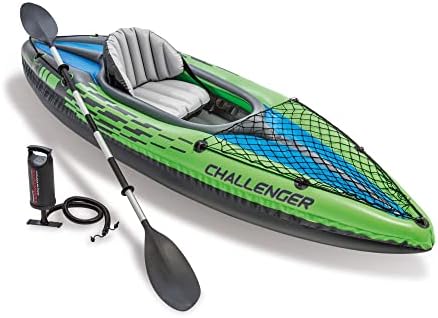
Budget pick: INTEX Challenger Inflatable Kayak Series: Includes Deluxe 86in Kayak Paddles and High-Output Pump, SuperStrong PVC, Adjustable Seat with Backrest, Removable Skeg, Cargo Storage Net
 Visit on Amazon →
This is the solo recreational boat of the pair, and it is the one I would hand a first-timer who wants to paddle a calm lake or a slow river without spending much. The removable skeg is the feature that matters most here. A short, wide, soft-floor boat wants to wander, and the skeg is what fixes that without you buying a better hull. Deploy it, and the boat holds a line well enough to enjoy. Leave it in the bag, and you will spend the afternoon correcting.
The adjustable seat with backrest and the cargo net are the two things that make it usable for a real paddle rather than a lap around the cove. The net keeps a dry bag and a water bottle off the floor, which matters more than it sounds, because a soft-floor boat with loose gear in the bilge gets twitchy.
Flaws but not dealbreakers: This is a low-pressure PVC hull with an inflated floor, not a drop-stitch floor. It will flex under you, and it will feel soft compared to a rigid boat. That is the design, not a defect, but it is also why I would keep it on flat, protected water. It is a recreational boat, and treating it like a sea kayak is how people get into trouble.
Anyone paddling solo on a lake, a pond, or a slow river who wants the whole kit in one box should start here.
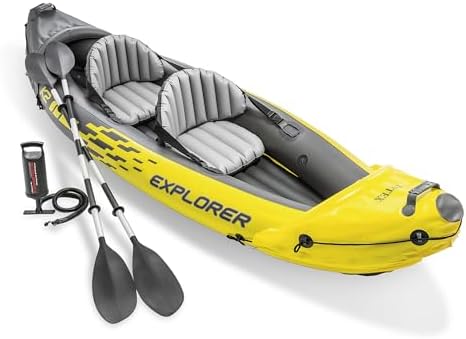
Tandem pick: Intex 68307EP Explorer K2 Inflatable Kayak Set: Includes Deluxe 86in Aluminum Oars and High-Output Pump, SuperStrong PVC, Adjustable Seats with Backrest, 400lb Weight Capacity
 Visit on Amazon →
The Explorer K2 is the two-person version of the same idea: adjustable seats with backrests, a high-output pump, aluminum oars, and a hull wide enough to keep two paddlers from fighting each other. For a couple or a parent and a kid on a calm lake, this is the format that works. Two seats mean two paddlers sharing the effort, and the wider platform is more stable at rest, which is what you want when someone in the boat is nervous.
The weight rating printed on the boat is a lab number. Treat it as a ceiling, not a target. On a hot afternoon with two adults, a cooler, and a bag of gear, the boat sits lower, the floor flexes more, and it paddles slower than it does empty. Plan your load around that reality and the boat behaves well. Load it to the number on the box and you will feel every inch of it.
Flaws but not dealbreakers: Tandem inflatables are heavy when fully loaded, and this one is no exception. Carry it to the water, do not drag it, and if you are launching far from the parking lot, a cart is worth the money. Also, two paddlers in a soft-floor boat need to paddle in rhythm, or you will zigzag.
Anyone who wants to paddle with a partner or a kid on flat water, and wants the pump and oars included, should look here first.
The setup sequence, step by step
This is the order that works. It is the same order every time, and after a few trips it becomes muscle memory.
Step one: Lay it out flat and read the hull. Unfold the boat somewhere clean, away from gravel and pine cones. Find the valves. Read the pressure recommendation printed on the hull and follow that number, not a number you read online. Check the box for the patch kit, the valve adapter, and the skeg before you throw the packaging away.
Step two: Inflate the floor or base chamber first. The floor gives the boat its shape. Fill it first and the side chambers have something to wrap around.
Step three: Inflate the side chambers in short alternating bursts. A few strokes on one side, a few on the other, and repeat. Filling one side completely before the other pulls the seams and the boat inflates lopsided, which you then have to correct.
Step four: Top off after a few minutes. PVC relaxes and stretches under pressure. The boat that felt firm when you stopped pumping will feel soft by the time you have assembled the paddle. Give it a second pass. This is the step people skip, and it is the step that decides whether the boat feels stiff on the water or wallowing.
Step five: Inflate and position the seat last. Seats sit better against a fully inflated hull. Inflate the seat base and the backrest, clip it in, then sit in the boat on land and check the position before you launch.
Step six: Install the skeg before the boat touches water. Push it in until it seats fully. Doing this in ankle-deep water with the boat floating away from you is how skegs get lost.
Step seven: Assemble the paddle and check the locks. The 86-inch paddles break into sections with push-button locks. Snap each joint together and give it a firm tug. A paddle that comes apart mid-stroke is a bad afternoon.
Step eight: Carry it, do not drag it. Dragging a loaded inflatable across pavement or shell is how you earn your first patch. Two people, one at each end, or a cart.
Step nine: Launch from shallow water. Step in at the edge, sit down centered, keep your weight low, and push off with the paddle rather than your hands. Sit centered and slightly forward of the seat back, not perched on the stern.
Step ten: Deflate and dry it completely before it goes in the bag. More on this below, because it is the step that decides whether your boat smells like a lake or like a locker room by August.
Inflating to the right pressure
Pressure is where recreational inflatables get abused. These are low-pressure boats, nothing like a drop-stitch board that inflates to double digits. Inflate to the pressure printed on your hull and check it by hand: the boat should feel firm and slightly yielding, not rock hard and not spongy.
Three rules keep you out of trouble. First, do not overinflate on hot pavement in direct sun. PVC expands as it heats, pressure climbs with it, and a boat that was fine at the car can be overstressed ten minutes later. Second, expect to top off once you are on the water, especially if the boat sat in the sun or you launched from a cold morning ramp into warmer air. Third, if the boat is going to sit inflated on shore, put it in the shade and crack a valve if you have no shade at all.
Making a soft-floor boat track straight
Tracking is the difference between paddling and correcting. Here is what actually helps on a recreational inflatable:
- Deploy the skeg. On calm water, it is the single biggest improvement you can make, and it costs nothing.
- Sit centered. Weight on the stern drags the bow up and the boat wanders. Weight too far forward buries the bow in chop.
- Use shorter, quicker strokes. Long, slow, powerful strokes in a wide soft-floor boat push water sideways instead of backward.
- Trim your load. Move your dry bag forward if the stern is dragging. A boat that sits level tracks straight.
- Do not fight the wind. In a chop, point the bow into the wind and take the short, steep stuff head-on rather than letting it catch your beam.
- Paddle in rhythm with your partner. In a tandem, matched cadence beats raw power every time.
Patching a PVC hull so the repair holds
Every inflatable leaks eventually. The question is whether the tear spreads or stops. A clean patch on PVC is a permanent repair, and I know that because my worst hull has a bicycle tire patch holding air three summers after the fact.
Deflate the boat fully and find the leak. Soapy water in a spray bottle works: watch for bubbles. Mark the spot, clean a generous area around it with rubbing alcohol, and let it dry completely. Cut a patch with rounded corners, bigger than the damage by at least an inch on every side, because square corners peel. Apply the glue to both the patch and the hull, let it get tacky according to the instructions, then press it down and work out the bubbles from the center outward. Weight it or clamp it and leave it alone for the full cure time. Glue that feels dry at ten minutes is not cured at ten minutes.
For a gash rather than a pinhole, patch both sides if you can reach the interior. And test the repair on shore before you trust it on the water. If you are patching a hull for the first time, practice on the material first and see how the glue behaves.
Common mistakes that ruin a day on the water
- Leaving the boat inflated on hot pavement or in a closed car. Heat plus PVC equals climbing pressure and stressed seams.
- Packing it away wet. That is how you get mold in the storage bag, and once it is in there, it stays.
- Skipping the skeg because the boat "seems fine." It is not fine. It is wandering.
- Buying a second pump before trying the included one. The high-output hand pump in the box is the right tool for a low-pressure hull.
- Relying on an electric pump that needs a car battery and twenty minutes. That is not hands-free, that is a parking lot project.
- Treating a weight rating as a target instead of a ceiling.
- Taking a flat-water recreational inflatable into open water, strong current, or whitewater. Wrong tool, real consequences.
What you still need beyond the box
Both boats here include the pump and the paddles, which is why the kit math is simple: the price you see is close to the price of getting on the water. What you add is the PFD, a patch kit with fresh glue, a dry bag, and a sponge and towel for the dry-down. If you launch far from parking, add a cart. Check current Amazon price on both boats before you commit, and confirm the pump and paddle are still listed as included, because kit contents change.
The short version
Inflate the floor first, then the sides in alternating bursts, then top off after the PVC relaxes. Seat last, skeg before the water, paddle locks checked. Carry it, launch shallow, sit centered, deploy the skeg. Dry it completely before it goes in the bag, and keep a patch kit with glue that has not turned to dust. Do that and a recreational inflatable will give you years of calm-water mornings, which is exactly what it was built for.